TABLE OF CONTENTS
Overview
Follow the steps below to quickly connect to the Stack Internal API with an API access token. This document assumes you have an understanding of basic API concepts and familiarity with Postman (https://postman.com) or Curl. For a production-ready API connection with full security, read the Stack Internal API article.
The Stack Internal API is in alpha status. Breaking changes are expected during this alpha period. Use at your own risk.
For detailed API documentation, go to https://api.stackoverflow.com.
Step 1: Create a working document
Create a working document or text file to use as you walk through this process. In that document, paste the following values from the API app you'll use to connect:
- Client ID
- Redirect URL
- Scope(s)
Get these from your site admin if you don't have them.
Step 2: Generate a code verifier and code challenge
Use Ping Identity (https://developer.pingidentity.com/en/tools/pkce-code-generator.html) to create a code_verifier and code_challenge. Make sure the challenge method is S256. Copy these values to your working document.
Step 3: Obtain the authorization code
Replace all "[values]" placeholders in this URL with your values, then paste it into your browser's address bar:
https://auth.stackinternal.com/oauth2/authorize?client_id=[Client_ID]&response_type=code&redirect_uri=[Redirect_URL]&scope=[Scope(s)]&code_challenge=[Code_challenge]&code_challenge_method=S256&state=1234abcd&nonce=abcd1234
In the URL above, separate multiple scopes with the HTML-encoded space character (%20) like this: &scope=nodes:read%20user:profile:read.
The nonce and state values above are not secure, and should be used only to test the API connection. Read the Stack Internal API article for more information.
Step 4: Authorize the application
After you visit this URL, you'll be prompted to log in to your Stack Internal account and authorize the application. Click Allow access. The site will then redirect you to a page that includes an authorization code in the URL like this:
https://app.example.com/stack-internal/callback?code=AuthorizationCode&state=YourState
Copy the authorization code (identified with "code=" in the URL) to your working document. Immediately move to the next step, as authorization codes expire in 10 minutes.
Step 5: Generate the access token
Use https://postman.com to send a POST request (application/x-www-form-urlencoded) to https://auth.stackinternal.com/oauth2/token. Include the following parameters:
| Parameter | Value |
|---|---|
grant_type |
Set to "authorization_code". |
code |
Set to the authorization code you obtained in the previous step. |
client_id |
The OAuth app's client ID (the same as in the previous step). |
redirect_uri |
The OAuth app's redirect URL. |
code_verifier |
Code verifier from the PKCE process (for example: from Ping Identity). |
Example Postman API access token POST
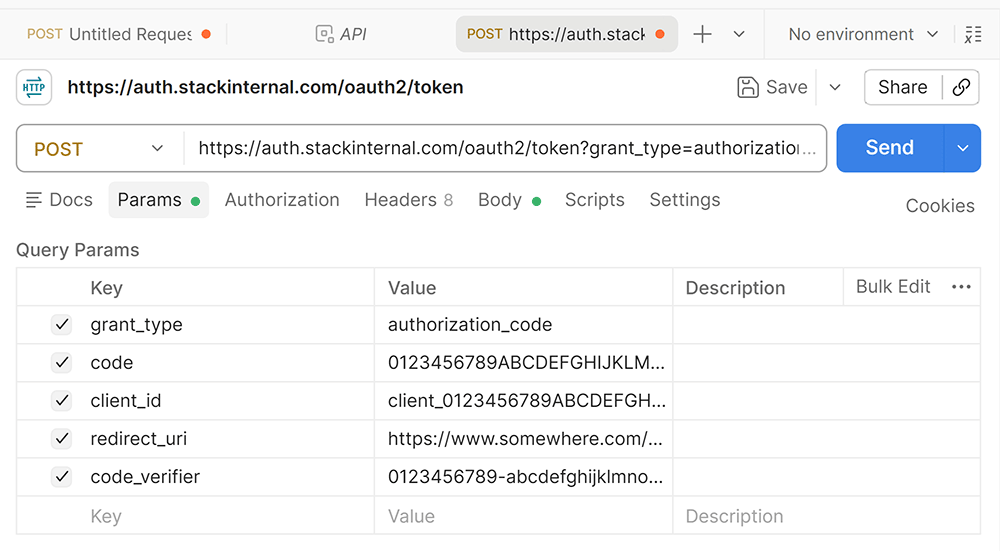
You should receive a JSON response that includes your API access token like this:
...
"access_token": "eyJhbGciOiJSUzI1NiIsImtpZCI6InNzb19vaWRjX2tleV9wYWlyXzAxSlBYTjZLRjdOQUVBWlRGRFlFU0FF..."
...
Copy the full access token value to your working document.
Step 6: Call the API
Use the API access token to call the Stack Internal API at https://api.stackinternal.com/v1/[endpoint] (for example: https://api.stackinternal.com/v1/users).
Users connecting to workspaces hosted in the EU will access the API at https://api.eu.stackinternal.com.
Send the access token in the Authorization header for each API request like this:
curl "https://stackinternal.com/v1/example" \
  -H "Authorization: Bearer [access_token]" \
  -H "Content-Type: application/json"
You can also use https://postman.com to access the API. Enter your access token on the POST "Authorization" tab as Auth Type: Bearer Token. Postman will automatically add it to the header.
Access tokens expire in five minutes. To learn more about automatically refreshing tokens, read the Stack Internal API article.