TABLE OF CONTENTS
Overview
The Stack Internal API allows you to use an external app or service to access your Stack Internal platform. You'll access the API through an OAuth app created by your site admin.
The Stack Internal API is in alpha status. Breaking changes are expected during this alpha period. Use at your own risk.
For detailed API documentation, go to https://api.stackoverflow.com.
You'll follow a multi-step process to connect to the Stack Internal API:
- Create a
code_verifierandcode_challenge. - Authorize the application and obtain an authorization code.
- Generate an access token.
- Call the API with the access token.
You'll need the following OAuth application parameters to complete this process:
- Client ID
- Redirect URL
- Scope(s)
If you don't have this information, reach out to your site admin before continuing.
This document assumes you have an understanding of basic API concepts and familiarity with Postman (https://postman.com) or Curl. We suggest using a working document or text file as you walk through this process.
For an abbreviated guide to quickly connect to the Stack Internal API for testing, read the Stack Internal API Quick Connect article.
Generate a code verifier and code challenge
The Stack Internal API authorization process uses PKCE (Proof Key for Code Exchange) for increased security. PKCE requires you to create a code verifier and code challenge. The code verifier is a random string, and the code challenge is a hashed version of that string.
Ping Identity has a helpful tool for generating these values here: https://developer.pingidentity.com/en/tools/pkce-code-generator.html.
Use the Ping Identity tool (or any other PKCE code generator) to generate the code verifier and code challenge strings. Copy both to your working document.
When you create the code challenge, the challenge method must be S256.
Obtain the authorization code
Once you have the code verifier and code challenge, call https://auth.stackinternal.com/oauth2/authorize and pass the following query parameters in URL using this format: ?parameter=value.
| Parameter | Value |
|---|---|
client_id |
The Client ID value from the OAuth application. |
response_type |
Set to "code". |
redirect_uri |
The redirect URL from the OAuth application. |
scope |
Define the level of API access you need. Set the scope value according to your application's requirements, selecting from the list of scopes granted to the OAuth app on creation. If you specify a scope your site admin didn't grant to the OAuth app, the process will fail and you'll receive an error. To specify multiple scopes, separate them with the URL-encoded space character (for example: scope=users:manage%20nodes:read%20content:delete).NOTE: If you want to be able to refresh the resulting API access token, add one additional scope: offline_access. |
code_challenge |
The code_challenge value generated in the previous step. |
code_challenge_method |
Set to "S256". |
state |
A non-guessable string. The request process returns this string unchanged, which prevents attempted cross-site request forgery (CSRF) attacks. You can also encode data in the string to maintain state (for example: pass a value) through the authentication process. NOTE: If you're creating a token manually (for development or testing, for example), you don't need to provide a state value. |
nonce |
A random string of any length, regenerated with each login. The nonce string specifically mitigates replay attacks, where someone stores the URL data and uses it later.NOTE: You can use any random string or hash generator to create the nonce value (for example: https://www.random.org/strings). |
Create a token you can refresh
Access tokens expire after 300 seconds (five minutes), but are easily refreshed with the process detailed in the "Token expiration and refresh" section below. To create a token you can refresh, add one additional scope when obtaining the authorization code: offline_access. We recommend adding this scope.
Example authorization code URL
https://auth.stackinternal.com/oauth2/authorize?response_type=code&client_id=YourClientID&scope=Scope1%20Scope2%20offline_access&redirect_uri=YourRedirectURL&code_challenge=GeneratedCodeChallenge&code_challenge_method=S256&nonce=YourNonce&state=YourState
Authorize the application
After you visit this URL, you'll be prompted to log in to your Stack Internal account and authorize the application.
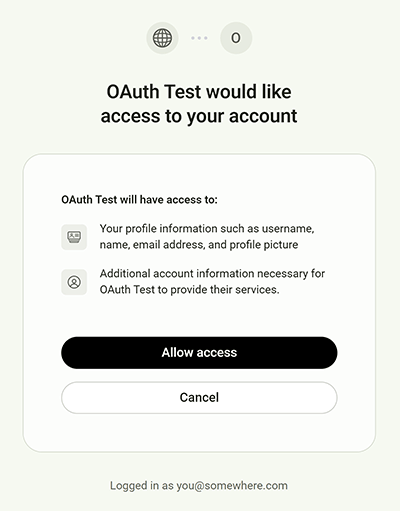
Click Allow access. The site will then redirect you to a page that includes an authorization code in the URL.
Example authorization URL
https://app.example.com/stack-internal/callback?code=AuthorizationCode&state=YourState
Copy the authorization code (identified with code= in the URL) to your working document.
Authorization codes expire 10 minutes after creation, so you should follow the steps below immediately to generate an access token. If you wait more than 10 minutes, you'll have to restart the authorization process.
Generate the access token
Use https://postman.com to send a POST request (application/x-www-form-urlencoded) to https://auth.stackinternal.com/oauth2/token. Include the following parameters:
| Parameter | Value |
|---|---|
grant_type |
Set to "authorization_code". |
code |
Set to the authorization code you obtained in the previous step. |
client_id |
The OAuth app's client ID (the same as in the previous step). |
redirect_uri |
The OAuth app's redirect URL. |
code_verifier |
Code verifier from the PKCE process (for example: from Ping Identity). |
Example Postman API access token POST
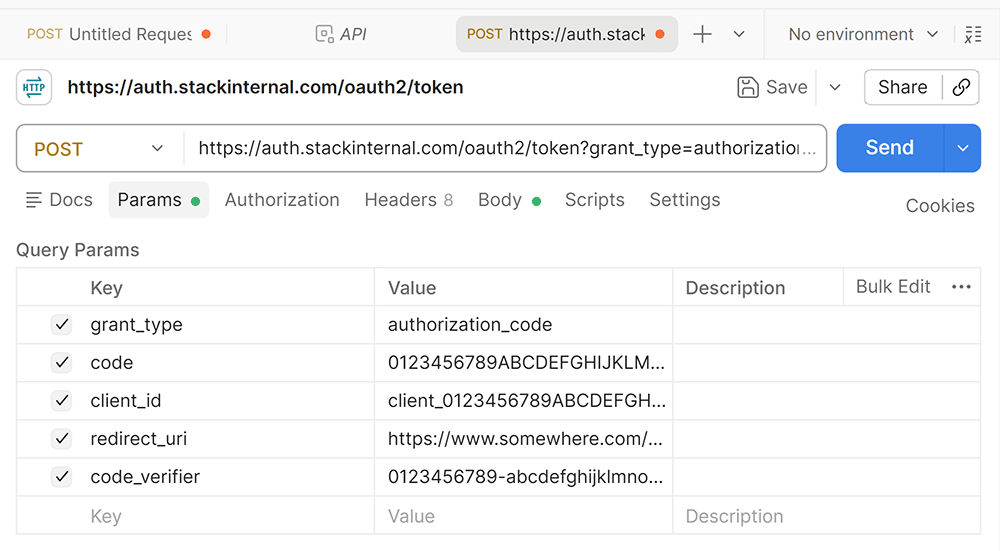
Access token response
After you submit the POST action, you should receive a JSON response with your API access token. You'll use this to authenticate future requests to the Stack Internal API. The response will also include the remaining seconds until the token expires in expires_in (and, if you added the offline_access scope, refresh_token).
Example access token response
{
  "access_token": "eyJhbGciOiJSUzI1NiIsImtpZCI6InNzb19vaWRjX2tleV9wYWlyXzAxSlBYTjZLRjdOQUVBWlRGRFlFU0FF…",
  "expires_in": 3600,
  "refresh_token": "GCOzb87tq7LWpSMaBCjVHnJPH",
  "token_type": "bearer"
}
Call the API
Use the API access token to call the Stack Internal API at https://api.stackinternal.com/v1/[endpoint] (for example: https://api.stackinternal.com/v1/users).
Users connecting to workspaces hosted in the EU will access the API at https://api.eu.stackinternal.com.
Send the access token in the Authorization header for each API request.
Curl authorization header example
curl "https://stackinternal.com/v1/example" \
  -H "Authorization: Bearer [access_token]" \
  -H "Content-Type: application/json"
You can also use https://postman.com to access the API.
When calling the API, don't send tokens as query parameters in the URL. URLs are often logged by browsers, proxies, monitoring tools, and support systems.
Token expiration and refresh
Access tokens expire in 300 seconds (five minutes). If an API call returns 401 Unauthorized, get a new token and retry the request.
The expires_in value in the token response indicates how many seconds the access token remains valid. Before it expires (or after an API request fails because the token expired) use the returned refresh_token to obtain a new token pair. You cannot recreate a refresh token from an access token or client ID.
To receive a refresh token, include offline_access in the scope value during the original authorization request. See the "Obtain the authorization code" section above for more details.
To get refreshed access and refresh tokens, call https://auth.stackinternal.com/oauth2/token. Include the following fields in an application/x-www-form-urlencoded request body:
| Parameter | Value |
|---|---|
grant_type |
Set to "refresh_token". |
refresh_token |
Set to the refresh token code obtained in the previous step. |
client_id |
The OAuth app's client ID (the same as in the previous step). |
This will return the same JSON as the previous call but with a refreshed access_token and a new refresh_token and expires_in.
In most cases, you'll want to automate the token refresh process.
Troubleshooting
Existing workspace user required
A user must already exist and be active in the Stack Internal workspace before an OAuth access token can be used with the Stack Internal API. API access does not create new users. If you haven't signed in to Stack Internal before, or have been deactivated, the OAuth sign-in may complete but API requests will be rejected until your account is created or reactivated in Stack Internal.
Common errors
| Error | What it usually means | What to check |
|---|---|---|
400 Bad Request during authorize |
The request is missing a PKCE value, has an invalid redirect URI, or uses the wrong environment. | Check redirect_uri, code_challenge, and code_challenge_method. |
400 Bad Request during token exchange |
The code expired, the verifier does not match, or the redirect URI changed. | Use the same redirect_uri and the original code_verifier. |
401 Unauthorized |
The token is missing, expired, malformed, or not trusted by the service. | Get a new token and send it in the Authorization header. |
403 Forbidden |
The token is valid, but the user or app is not allowed to do the action. | Check tenant, role, and scopes. |
| CORS error during token exchange | The app is not using an allowed origin for that environment. | Check the app host and environment configuration. |
404 Not Found |
The resource does not exist or is not visible to the caller. | Check the resource ID and tenant access. |
Scopes
The table below lists available API scopes.
| Scope | Name | Description |
|---|---|---|
auth:manage |
SSO management | Configure and manage SSO via WorkOS. |
connectors:manage |
Connector enablement | Enable and configure connectors for a workspace. |
content:ingest |
Content creation | Add content to the workspace. |
content:delete |
Content deletion | Trigger deletion of ingested content in their workspace. |
ingestion:manage |
Ingestion management | Create, enable, or disable workspace ingestion configuration, and operate ingestion admin surfaces. |
mcp:manage |
MCP management | Enable/disable MCP access for the workspace. |
nodes:read |
Knowledge node access | Read and search Knowledge Node content and metadata. |
oauth-apps:manage |
OAuth app management | Manage OAuth applications for WorkOS Connect or internal integrations. |
analytics:read |
Analytics access | Access analytics features and data. |
smes:manage |
SME management | Perform SME management actions |
user:profile:read |
Profile read | Read the signed-in user's profile. |
users:manage |
Users management | Perform user management actions |
workspace:manage |
Workspace management | Manage workspace lifecycle and configuration. |